For artists across disciplines—from oil painters seeking archival stability to acrylic enthusiasts demanding quick adhesion—stretching canvas is more than preparation; it’s a precision craft rooted in materials science and historical technique. This guide demystifies the process, offering a visual roadmap that empowers you to create custom supports tailored to your medium. Whether you’re exploring “how to stretch canvas visual guide” for the first time or refining your approach to the best stretched canvas for oil painting, we’ll delve into the why, what, and how with expert-level detail.
Drawing on principles from art conservation and engineering, we’ll cover material selection (cotton vs. linen debates), step-by-step execution, and troubleshooting rooted in physics like tensile strength and hygroscopic behavior. By the end, you’ll produce taut, durable surfaces that withstand decades of display, saving costs while elevating your work’s integrity. Let’s assemble the frame and begin.
The Professional Imperative: Why Stretch Your Own Canvas?
In professional studios, pre-stretched canvases serve as conveniences, but they often fall short in customization and longevity—issues amplified by inconsistent factory tension or generic priming. Stretching your own allows mastery over variables like weave density and surface tooth, ensuring compatibility with everything from impasto oils to layered acrylic glazes.
Core Advantages in Practice
Precision Control: Adjust tension to match your medium’s demands; for instance, the best stretched canvas for oil painting requires a medium-loose pull to accommodate oil’s slow drying and slight expansion.
Economic and Archival Efficiency: Rolls yield multiple pieces at 30-50% less cost per square foot, using archival fabrics that resist cracking—vital for conservation-grade work.
Interdisciplinary Insight: Borrowing from textile engineering, DIY stretching optimizes fabric’s modulus of elasticity, preventing the micro-fractures seen in mass-produced options.
Historical Fidelity: Echoing Renaissance methods (e.g., Leonardo’s linen supports), it connects you to traditions while adapting for modern mixed media.
Drawbacks include time and space needs, making it ideal for series production or custom gallery-wrapped stretched canvas, but less so for rapid sketches. Professionals choose DIY when scale or specificity matters, such as in exhibitions where unprimed canvas allows bespoke sizing.
Materials Science: Selecting Fabrics, Bars, and Primers
Fabrics: Weave, Weight, and Medium Match
Canvas derives from hemp or cotton “duck” (from Dutch “doek,” cloth), but linen (from flax) dominates for its low lignin content, minimizing yellowing.
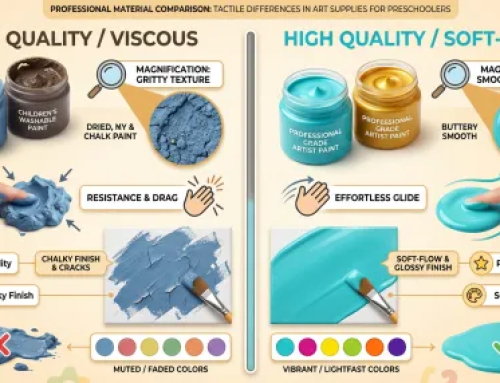
Cotton Duck (7-12 oz): Versatile for acrylics; its open weave promotes even gesso absorption but warps under humidity (hygroscopic index ~8%). Ideal for primed vs unprimed canvas experiments.
Linen (7-10 oz): The best stretched canvas for oil painting; finer threads (120-200 ends per inch) yield superior tooth for glazing, with tensile strength up to 50% higher than cotton.
Sizing Note: Unprimed rolls ($0.50-1.50/sq ft) for custom control; primed skips initial sizing but limits tooth adjustments.
Stretcher Bars:
Standard Pine or Fir: Lightweight (3/4-inch depth) for portability; kiln-drying prevents cupping.
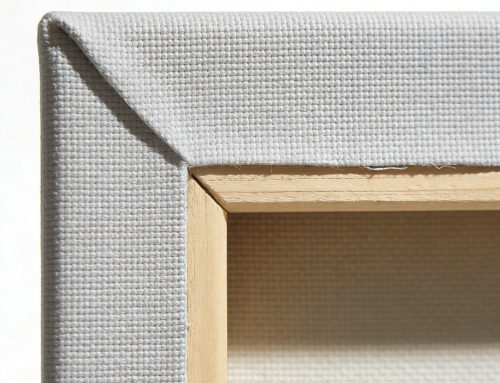
Deep-Profile Oak: 1.5-inch for gallery-wrapped stretched canvas, distributing load via mitred joints (45-degree angles reduce shear stress).
Hardware: Brass keys for incremental tensioning; galvanized staples to avert corrosion.
Tools: Ergonomics and Precision
Canvas Pliers: Rubberized jaws mitigate fabric shear during pulls.
Staple Gun: Adjustable pneumatic models for consistent penetration (3/8-inch legs).
Primers: Acrylic gesso (pH-neutral for longevity); rabbit-skin glue for traditional oils, though hygroscopic.
| Component | Professional Spec | Medium Fit | Key Property |
|---|---|---|---|
| Cotton Duck | 10 oz, 200-thread count | Acrylics | High absorbency (20-30% moisture regain) |
| Linen | 8 oz, Belgian weave | Oils | Low expansion (2-3% under load) |
| Oak Bars | 1.5″ deep, FSC-certified | Gallery Wrap | Compressive strength >5,000 psi |
This selection ensures your DIY stretched canvas for large formats withstands environmental stresses.
The Canvas Stretching Process
Rooted in biomechanical principles (even force distribution), this method yields uniform tension (~15-20 psi). Visualize annotated diagrams: close-ups of pleats, tension vectors.
Phase 1: Preparation and Acclimation (10 minutes)
- Environmental Setup: Work in 40-60% relative humidity to stabilize fabric’s equilibrium moisture content—high RH causes expansion, low leads to brittleness.
- Fabric Cutting: Measure frame dimensions plus 3-4 inch margins. Align with weave (warp vertical for vertical pulls); score and snap for clean edges. For gallery-wrapped stretched canvas, extend margins for edge folding.
Phase 2: Frame Assembly (5 minutes)
- Jointing Bars: Interlock mitred ends; secure with braces. Verify squareness via diagonal equality (Pythagorean check: variance <1/8 inch).
- Reinforcement: Pre-insert keys in slots for later micro-adjustments, especially in DIY stretched canvas for large formats (>36 inches).
Phase 3: Tension Application (20-30 minutes)
- Centering: Drape fabric painting-side out; secure temporary center tacks on each side to establish baseline.
- Longitudinal Pulls: From one long side’s center, exert perpendicular force (use pliers for 50-100N grip); staple. Mirror on opposite side for balanced vector forces. Progress outward in 1-2 inch increments, alternating to avoid bias.
- Lateral and Corner Integration: Repeat for shorts. Corners: Form a mitered fold (45-degree overlap) to distribute stress evenly—staple doubly, trim to 1/4 inch. This prevents “bridging” in gallery-wrapped stretched canvas.
- Verification: Invert; apply uniform finger pressure—surface should yield <1/8 inch with resonant “thump.” Adjust keys to bow bars outward if under-tensioned.
Visual Sequence: Pre-pull (loose drape), mid-pull (stapled centers), post-fold (taut corners).
Phase 4: Surface Preparation (10-15 minutes)
- Priming Layers: For unprimed canvas, apply rabbit-skin glue size (1:10 rabbit skin to water) to seal pores, followed by 2-3 gesso coats brushed parallel to weave. Sand (220-grit) between for smoothness.
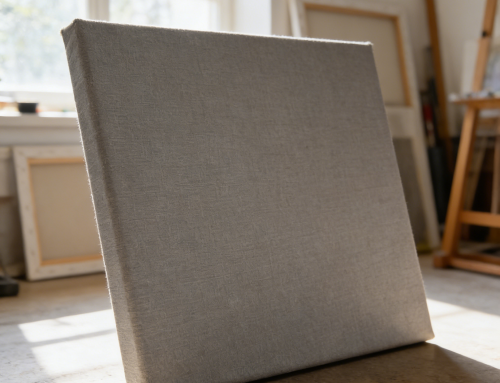
- Edge Finishing: Gesso-wrapped edges for seamless continuity in frameless displays.
This yields a support with optimal “give” for brushwork.
Medium-Specific Optimizations: From Oils to Mixed Media
Professional stretching adapts to chemistry—oils demand flexibility, acrylics rigidity.
Oils: Engineering for Long-Term Flex
The best stretched canvas for oil painting uses linen with oil-ground priming (linseed-based for compatibility). Looser tension (10-15 psi) allows for alkyd expansion; conservation notes emphasize anti-cracking via flexible bars.
Acrylics: Precision for Adhesion
Cotton primed canvas suits here—its higher tooth grips polymer emulsions. Tighter pulls (20 psi) prevent delamination; add silica additives to gesso for enhanced keying.
Mixed Media and Large Formats
For collages, reinforce seams with linen tape (pH-neutral adhesive). In DIY stretched canvas for large formats, employ ratchet straps for pulls, mimicking industrial looms.
| Medium | Tension Level | Primer Type | Adhesion Factor |
|---|---|---|---|
| Oil | Medium-Loose | Oil-Based | High (for glazing) |
| Acrylic | Tight | Acrylic Gesso | Medium (quick-dry) |
| Mixed | Variable | Unprimed Custom | Customizable |
Troubleshooting: Scientific Fixes for Common Failures
Failures stem from physics: uneven stress or environmental mismatch. Address systematically.
- Loose Stretched Canvas: Hygroscopic slack from humidity. Remedy: Controlled misting (distilled water, 10% solution) induces 1-2% shrinkage; re-key for equilibrium.
- Puckering: Fabric skew from non-perpendicular pulls. Solution: Steam (low-heat, verso only) to relax fibers; realign weave.
- Tears: Excessive shear (>150N). Prevention: Plied grips; test fabric’s burst strength pre-cut.
- Frame Warp: Compressive failure in bars. Cure: Climate-stable storage; opt for finger-jointed woods.
Illustrated Diagnostics: Saggy surface (cause: RH>70%) vs. corrected tautness.
Elevate with engineering: For hexagons, use flexi-strips with segmented pulls. In conservation, stretching mirrors panel preparation—both prioritize pH-neutral supports to avert acid migration.
Gallery-wrapped stretched canvas integrates seamlessly with framing theory, allowing edge-painting for optical continuity. For primed vs unprimed canvas in experiments, unprimed enables pigment-infused grounds, echoing alchemical glazing techniques.
Store vertically in acid-free sleeves (50% RH ideal); varnish post-painting to seal against pollutants. Annual inspections check for tension loss—mist and key as needed. This aligns with ICOM guidelines for 100+ year stability.
Craft a Legacy with Every Stretch
Mastering how to stretch canvas fuses art with science, yielding supports that honor your vision’s durability. From selecting the best stretched canvas for oil painting to resolving loose stretched canvas, these techniques span centuries of practice. Experiment confidently—your next piece awaits. Share your refinements in the comments.
Related Posts